Solar Installation Series – Part 4
Introduction
This post will cover the solar panel installation on my roof system. Take a minute to read the previous posts in the series to be up to date.
Part 1: Solar Power System – Design and Planning
Part 2: Unique Roof Mounts for Solar Panels
Part 3: Lifting Solar Panels – Innovative Solutions
Setup
Before you try to put your panels up, make sure that everything is in order electrically. The panels have their own electrical connectors that you connect to each other when you are creating a string in series. However, you still need a connection at the end of the string to complete the loop. It is difficult to run wire after the panels are installed, so get it done before. Also, it helps to have the wires pre-terminated with the appropriate connectors. If your string is short enough, you can find cables that are already pre-made with the appropriate connectors. In my case, I had to make my own cables.

Solar Panel Installation Safety and Regulations
When installing solar panels on a roof, you have to consider safety and regulatory items. The main one being that all solar installations on the roof of a structure need to have a Rapid Shutdown System (RSS) installed. There are a few components to the system that we will cover in later posts, but the one we need for the actual installation is the RSS module. In my case, I used the Tigo TS4-A-F rapid shutdown module, which clips onto the back of the panel and has two connections for the actual solar panel, and two more connections to continue the string. These modules clip onto the back of the solar panels and it is helpful to go ahead and install them prior to lifting to the roof.

The last thing is to make sure that your rails are properly grounded. If your rails have sections (which will be true in most cases), they need to be grounded between the rails. The grounding method may be different depending on the system, but all rails need to be properly grounded. I have my rails connected to each other with the metal straps recommended by the strut channel company and that acts as the ground between section. I then have the end of each rail connected together to a ground wire and a grounding rod at the base of the building.

Installation
If you have done your planning and preparation, the installation of the panels will be relatively straight forward. It still takes time. In my case it took about 5 hours to get the panels up and installed on the roof.
To keep the roof free of unnecessary clutter, I elected to pull each panel up and install it. The last four panels were pulled up and stored because the ramp needed to be removed to complete the installation.

To lock the panels to the rails, I used aluminum solar panel clamps that could clamp the edge of two panels at the same time. For these, I had to buy bolts that would fit the spring nuts used for the strut channel, which were 1/4″-20.


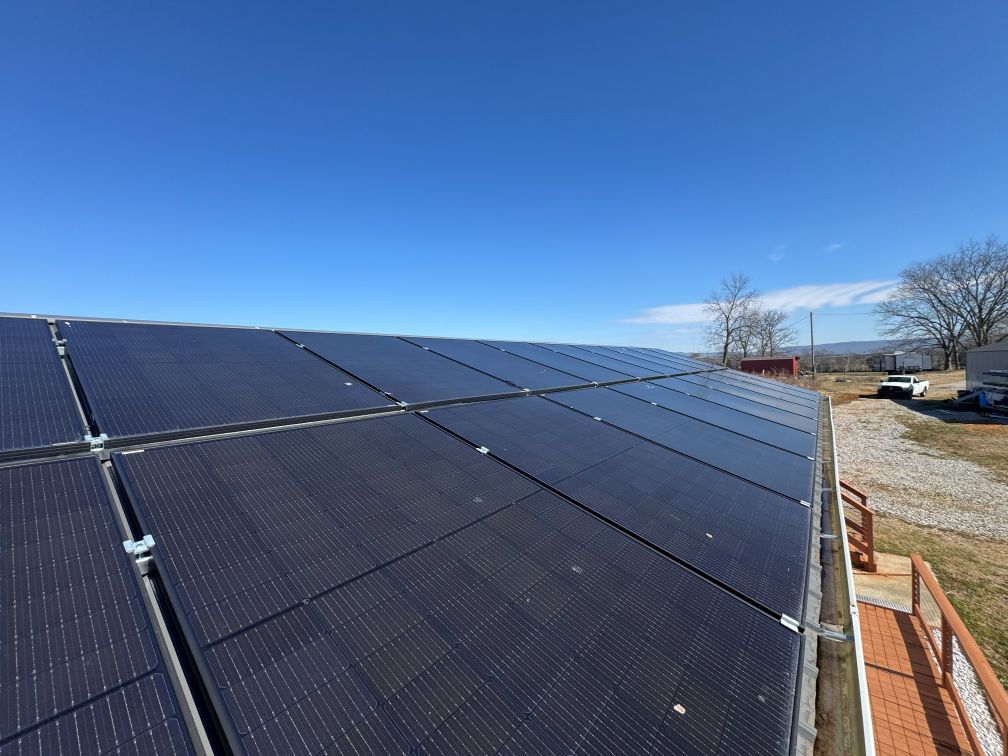
Below are pictures of the full array of panels.


You may notice that the clamps are shifted down on the panels, with one clamp near the bottom edge and the other clamp about a quarter of the way down from the top. During the rail installation, I was limited to putting rails where the purlins were underneath the steel roof. I didn’t want to have the solar panels overhang the gutter, nor did I want them extending past the ridge of the roof. They are perfectly stable and secure, even with the asymmetric mounting.
Next we will start looking at the batteries and inverters and the installation and hookup of those systems.
Thank You
Thank you for reading my post. If you find that you gained some knowledge and would like to read more, please consider subscribing. It’s free and it helps us get sponsors for future content. Also if you feel we are worthy of a small donation, you can leave a tip at the button below. Every little bit helps as the projects can be quite costly.
Leave a Reply