Solar Installation Series – Part 2
Introduction
In this post, I will cover roof mounts needed to attach solar panels to a metal roof. I will talk briefly about some mounting hardware available on the market. Then I will talk about what I ultimately did to secure my solar panels to the roof.
It would be a good idea to read the previous post of this series.
Part 1: Solar Power System – Designing and Planning
Mounting Criteria
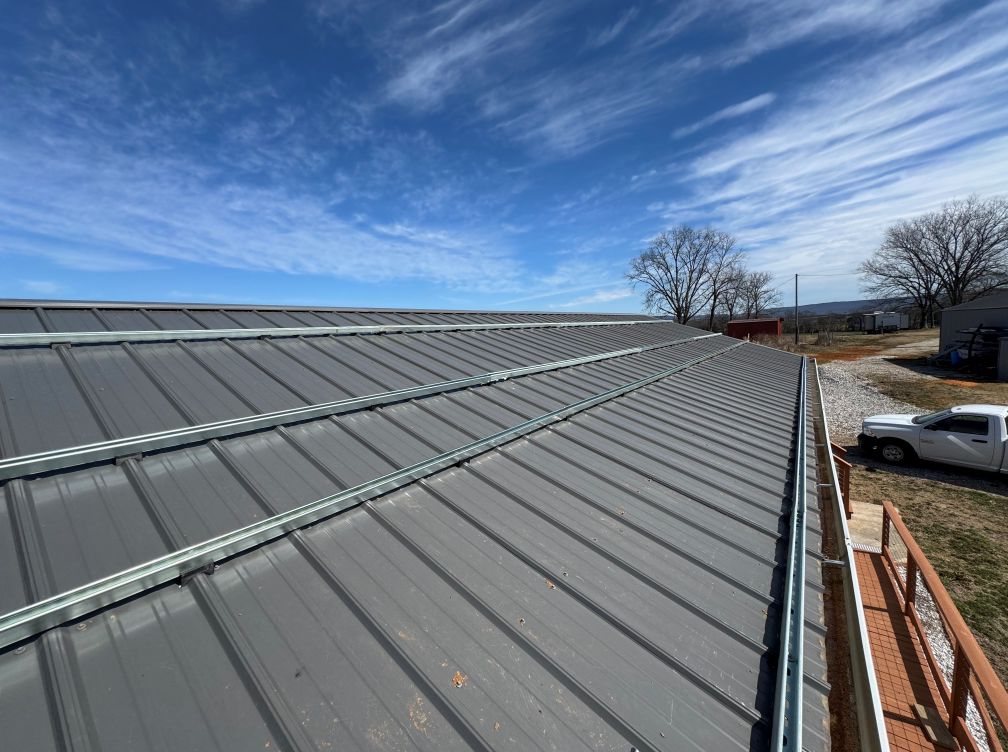
I am mounting the solar panels to a steel-clad pole barn. The roof panels are TUFF-RIB, which has a specific pattern. Holes in roofs are bad. Holes increase the chance of water intrusion. I want to put the mounting bolt through the peak of the rib so that it minimizes that risk.. The fasteners for the roof mounts need to screw into the roof structure below the metal roof panels. I don’t want to depend on one or two threads biting into the thin metal (26 gauge).

Another criteria is that I wanted to keep the solar panels as close to the roof as possible. This will help minimize chances of heavy winds getting under the panels and peeling them off. While some low pressures are created as the wind moves over the top (even flat plates create lift), it is minimal and keeping wind from getting under them makes it nearly a non-event. Plus, having the panels close to the roof just looks good too!
The last criteria for the roof mounts, and the driving factor, is cost. I’m just a poor farmer/blogger/pretend engineer.
Mounting Options
There are several roof mounting options out there. I will list just a few with their associated prices (prices may vary) and how many I would need to complete the mounting of my solar arrays. My solar arrays will be two rows of ten panels each, covering a distance of nearly 40 feet for each row. Each row will need to have two rails to mount the panels. That is 160 feet of rails and then the hardware to mount the rails to the roof and the panels to the rails. The minimum height above the roof needs to be 3/4″ to clear the ribs of the steel roof.
Commercial Rail Options
Tamarack Solar 90743 flush mount kit comes with (8) 93″ rails and mounting hardware. I found this product listed at $585. For my project I would need 3 kits, so my cost would be $1755.
SnapNRack Ultra Rail is 172″ long and costs $45 per rail. Plus hardware to mount the rail which is around $17.50 per mount. I didn’t see how many mounts you need for this rail, but three foot spacing is probably a reasonable estimate. For my roof, I would need 53 mounts and 12 rails coming to a total of $1467.50. SnapNRack has a mounting option for my roof panel listed on their website, but I haven’t yet found it for sale on a website.
Commercial Mounting Brackets
If you have a metal building with the TUFF-RIB roof panels, your options for mounting brackets that don’t put holes in the flat part of the panel are next to zero. If you have a standing seam metal roof, you have tons of options as those just clamp onto the vertical seam and there is no need to poke holes in your roof.
There are plenty of individual pieces of rails and mounting brackets that you can piece together your own kit. You may save some money or it may cost you a lot more. Keep in mind that depending on your system, you may have to pay freight charges because of the size of the pieces.
I failed to find a kit or components that fit my design criteria and were reasonably affordable. So I guess I’ll design my own.
My Solution
Strut Channel
To keep things more affordable, I will go with something that a lot of DIYers are doing for solar installation and that is using strut channel. Strut channel, commonly known as Uni-strut or Superstrut, is a u-shaped rail that can be bolted and connected to in many ways. It is common for electrical conduit mounting and even used to move heavy loads because there are trolleys that can be inserted into the channel to move things easily. There are also solar-specific mounting hardware for Uni-strut. And it is available at Home Depot or Lowe’s, which means that you don’t have to pay freight, especially if you have a pickup truck. Strut channel is also fairly cheap, coming in a $37.50 per 10 feet and if you buy 10 or more (from Home Depot) it’s drops to $31.75 per 10 feet. This would bring my total for my rails to $508.
I still need to mount the rails to the roof, and unfortunately the options for unistrut are just as bad as the other tailor-made units for my roof panels. Yes, you can mount them and fairly cheap, but you are introducing several holes to the roof. The roof structure has 2×6 purlins between the metal trusses, and are oriented on edge, so there is only 1.5″ of board to hit with the screw. This becomes more difficult with some of the options on the market that have multiple holes that all need fasteners to achieve the strength. Most of those fasteners would miss the edge of the board.
3D Printed Bracket
My solution was to 3D print a mounting bracket. To be fair it is not so much a mounting bracket as a spacer for the rails, but we’ll refer to it as a bracket for now. The bracket will sit over the ridge of the roofing panel and will have a channel for the rail to sit in and a single hole for the fastener to go straight down to the purlin below. The rail will be fastened to the roof structure through the bracket, not fastened to the bracket and then the bracket fastened to the roof. The bracket will not actually be holding the rail to the roof – that job is for the fastener.


Design Process of the Bracket
To make this piece, I first got a small section of the roof and modeled the outline in Fusion. I made it tall enough so that it could handle the compressive loads of the rail tightening down on it with the fastener. The hole for the fastener is centered in the bracket itself. I used that as my drill guide to make sure I drilled the hole at the top of the ridge of the roof panel.
To aid in waterproofing, I added two small channels on the high side and low side of the bracket. Small sections of TPU filament fit in the channels to act as a gasket to help redirect water off the ridge. I also printed a TPU washer to help seal the top. I found that using a 50% infill was sufficient to handle the compression of tightening the mounting screw. The slot on the top of the bracket did a good job holding the channel straight and in place.


The Perfect Solution?
In a word, no. However, this was quite good for the amount of money it cost (plus a little time to print all the brackets). There was a flaw in my roof mount design. It failed to account for the roof structure underneath the steel roofing panel not being straight. There were some boards that had a warp to them. I could see it in the screws that were in the metal roofing, but my design was not tolerant of that deviation. There were times where I thought I would have to start over with a new design to accommodate for warped boards. I did get the brackets and the rails to follow the boards, but some needed convincing.


Conclusions
For a long time doing anything with solar was expensive (and for the most part still is). However, if you are patient and know where to look you can get great deals compared to 10-15 years ago. While solar panel prices have dropped, the price of the supporting hardware can really put a dent in your budget. I am satisfied with my roof mounting solution. As of writing this post, the panels have been on the roof for nearly a year. They have encountered all the weather that Tennessee can throw at them, including 60+ mph winds. The 3D printed spacers are still alive an well.
In the next installation of this series, we will cover mounting the panels to the roof.
Thank you
Thank you for reading my post. If you find that you gained some knowledge and would like to read more, please consider subscribing. It’s free and it helps us get sponsors for future content. Also if you feel we are worthy of a small donation, you can leave a tip at the button below. Every little bit helps as the projects can be quite costly.
Leave a Reply